Controlling and balancing the exposure throughout an entire image can be difficult when you have brighter or darker elements in different parts of a scene. More often than not with landscape photography the sky will be much brighter than the foreground – up to 6 or 7 stops difference depending on what time of the day you are shooting. When shooting things like a city scene during the night you will tend to find the reverse happens – the foreground will be much brighter than the sky with light trails and city lights tending to become overexposed with longer exposures. It is possible with post processing techniques in software packages like Adobe Photoshop to capture multiple images (bracketed exposures) for different parts of the scene and to blend them together, or to use software adjustments like the “gradient filter” in Adobe Lightroom or Adobe Camera RAW to change the exposure and colours in certain parts of an image like the sky.
The other option would be to use graduated neutral density filters to control the exposure in the brightest part of the scene, therefore capturing images with a balanced sky and foreground, and contrast throughout the entire image. The benefits of using filters include being able to expose the entire scene correctly in a single shot, or to get different parts of the scene closer together in exposure when choosing to blend multiple images together in post processing, reducing time required when editing images.
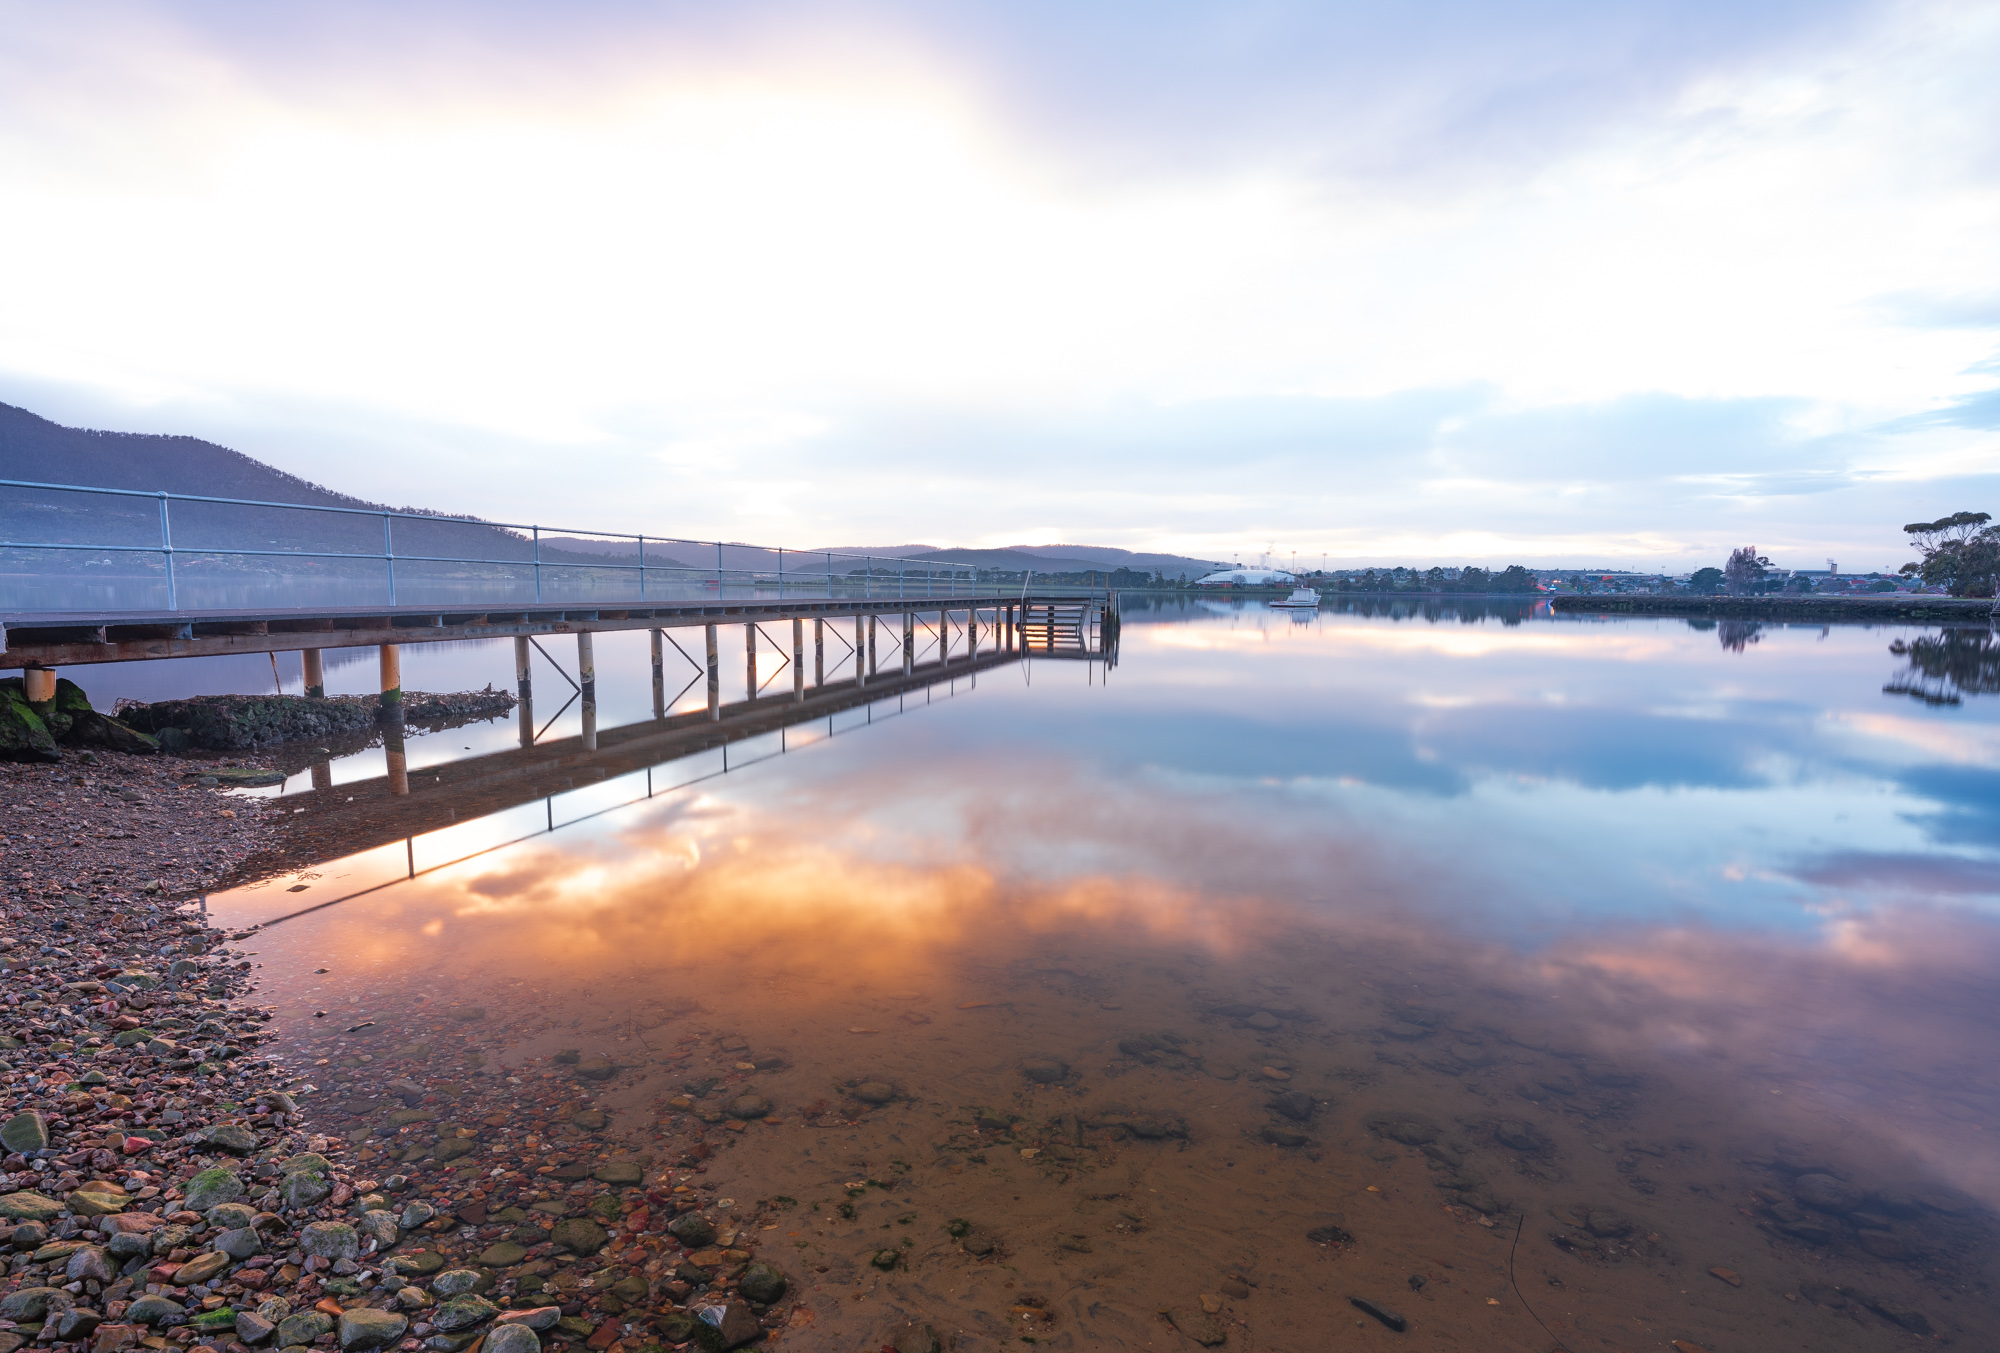
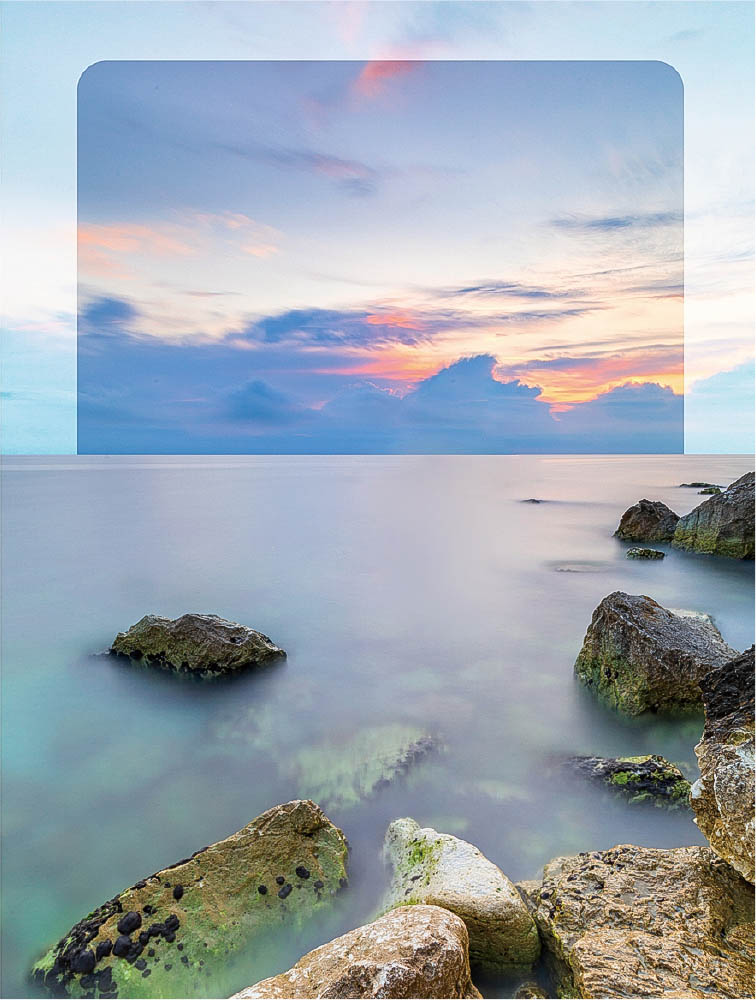
NO GND
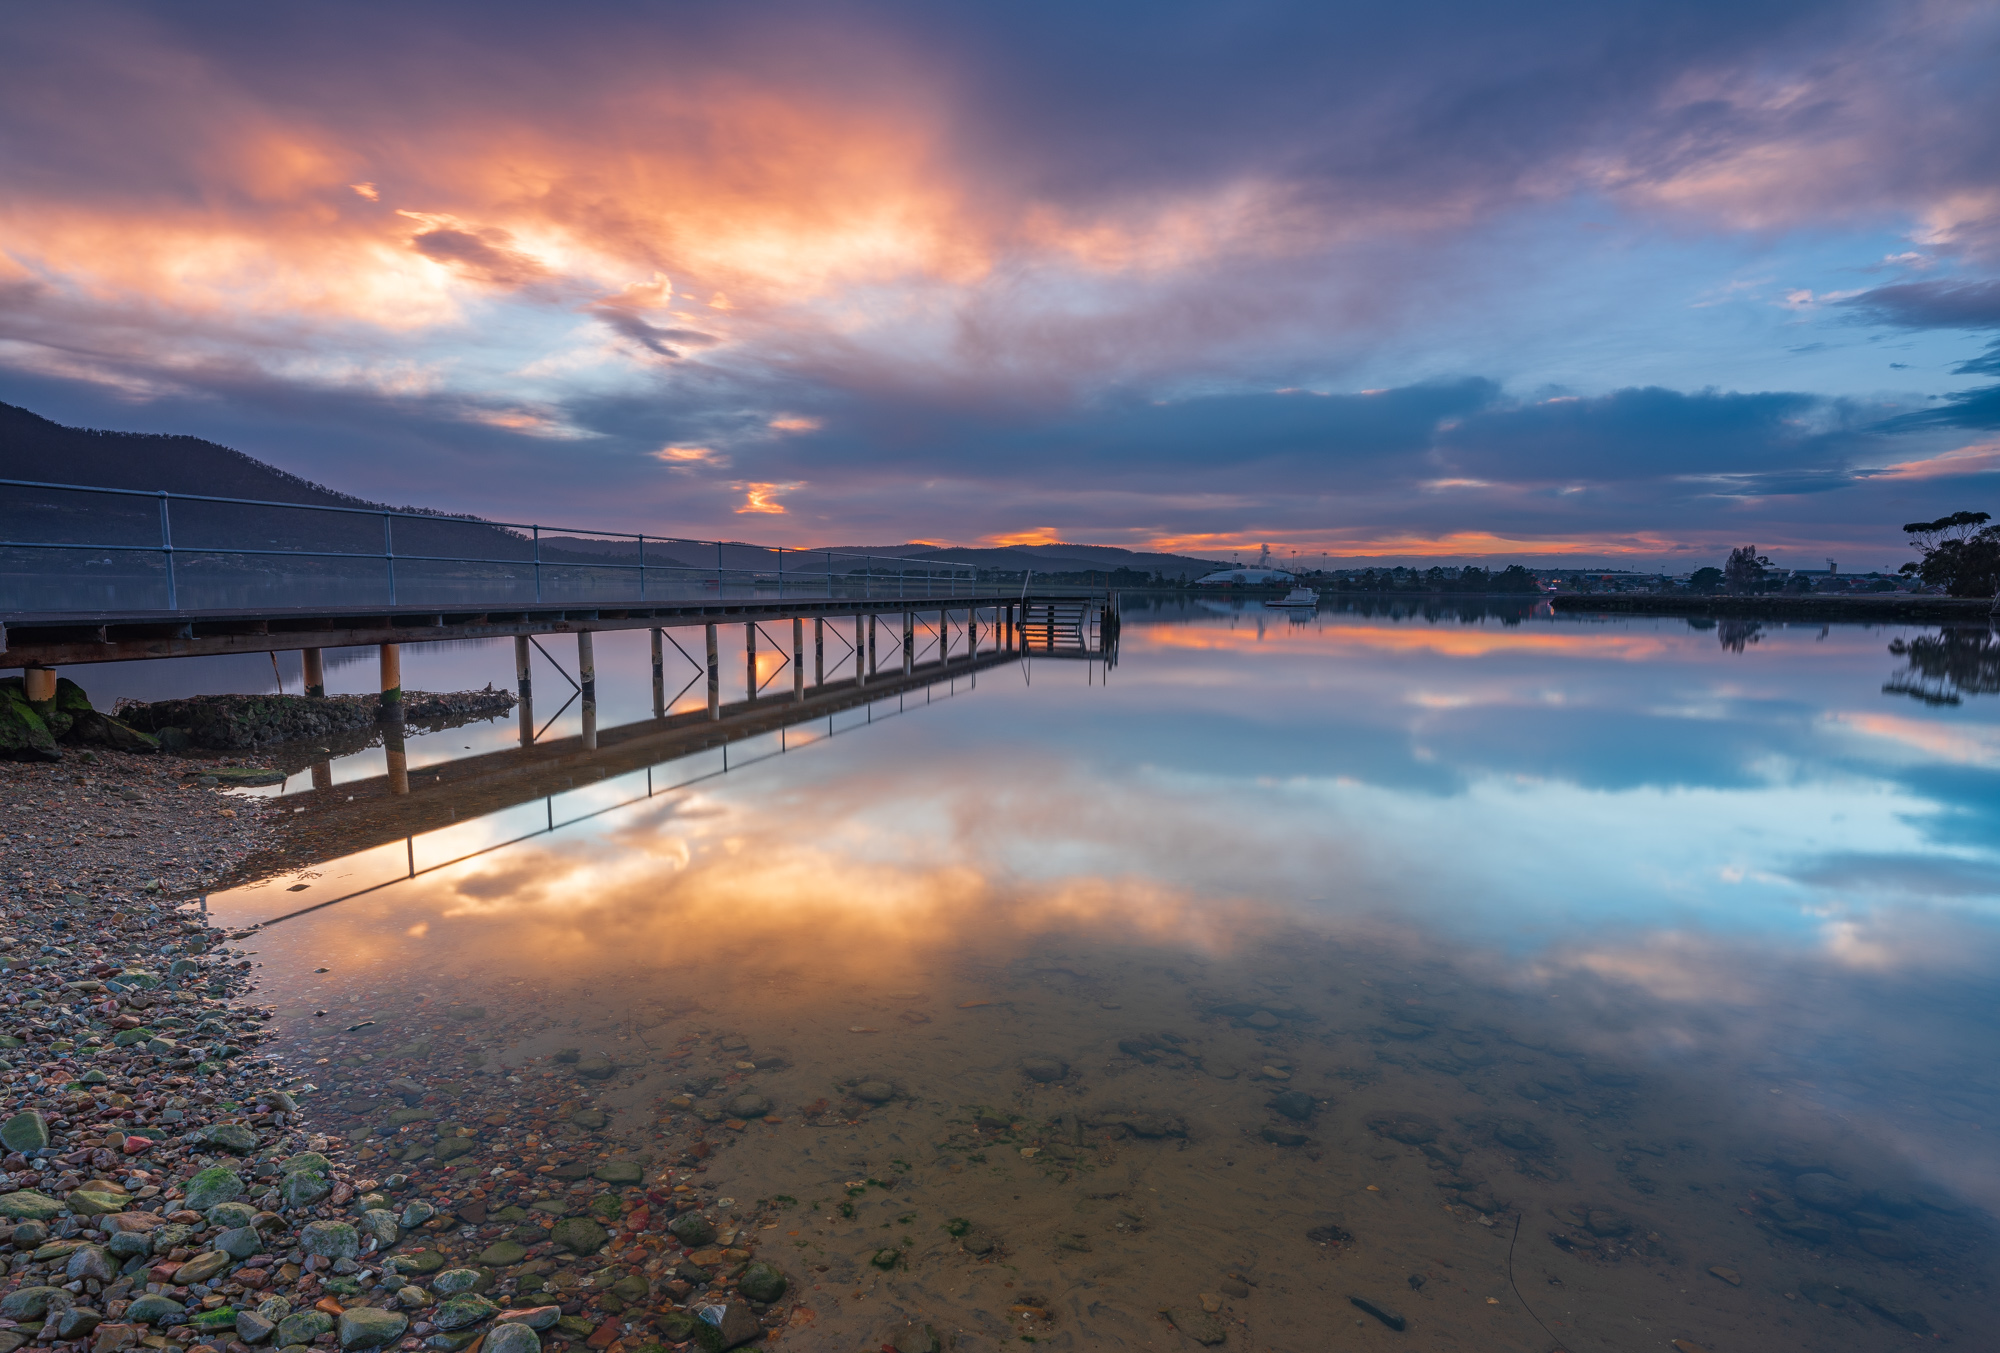
WITH MEDIUM GND
What is a graduated neutral density filter?
Graduated neutral density filters are typically rectangular pieces of glass (although they are also available as circular filters in the NiSi product range as well) with a gradient transition from dark to light in varying strengths. The gradient can run from darkest at the top to lighter in the middle for filters such as a soft or medium grad, or from darker in the middle to lighter at the top for reverse graduated filters. The strength or density of the gradient is represented in stops of light in the darkest part of the filter, with each stop of light being a 0.3 decimal value. So for a 3 stop soft grad, you will see the value of 0.9 printed on the filter. For a 4 stop medium grad it will be represented as a 1.2 and so on.
Graduated neutral density filters are called “neutral” because they should add no color cast or any noticeable change in the white balance in the area of impact of an image. The gradient is designed to darken either the sky or foreground depending on how it is aligned, but colour reproduction should not be impacted when using high-quality optical glass to manufacture ND filters.
The focal length and physical build size of any individual lens will determine what system or size of graduated neutral density filters and filter holder will be required. NiSi offer systems in 75mm for smaller compact cameras, 100mm for standard focal lengths as wide as 16mm (and sometimes wider depending on the specific lens), and lens screw thread sizes to 82mm like the Canon 16-35mm f/2.8L, or 150mm or 180mm systems for lenses wider than 16mm and those that tend to have a “bulbous” front glass element such as the very popular 14-24mm Nikon f/2.8.

Selecting the correct density of graduated ND filter to use
Choosing the correct graduated neutral density filter will depend on a couple of major things – the amount of difference in light (measured in stops) between different parts of the scene, and environmental factors like whether there is a flat, uninterrupted horizon line or elements like mountains, trees or buildings above the horizon. Where the sun or other bright parts of the scene are positioned will impact the selection of ND filter as well.
To make a decision about what density of graduated ND to use (eg. 3 stop or 4 stop) a meter reading of both the sky and foreground will need to be done. To do so you will need to –
- Set your camera up on a tripod and ensure your camera is in Manual mode. To take a meter reading of the foreground in your scene get your shutter speed, ISO, and aperture correct, and ensure the foreground it is being exposed at 0 EV. This is best done in Evaluative or Centre Weighted metering modes.
- By either moving your metering area using the camera controls or tilting your camera upwards towards the sky and not moving your metering point (or in whichever direction the brighter parts of the scene are), take note of the meter reading and the variation of stops of light within this part of the scene. Do not change the camera settings that were set to meter correctly for the foreground. The difference in exposure level will be measured in variations of +/- 1EV (or even +/- 1/3EV) on most cameras.
- The difference in EV levels (or stops of light) will be the requirement when choosing what strength of grad filter to use. The aim is to get the foreground and sky within 1 stop of light difference of each other. So if the sky is 3 stops brighter than the foreground, either a 2 stop or 3 stop graduated ND will be required to help balance the exposure of the brighter part of the scene.
| ND | OPTICAL DENSITY | F-STOP REDUCTION | TRANSMITTANCE % |
| ND4 | 0.6 | 2 Stops | 25% |
| ND8 | 0.9 | 3 Stops | 12.5% |
| ND16 | 1.2 | 4 Stops | 6.75% |
| ND32 | 1.5 | 5 Stops | 3.12% |
When to use a soft graduated neutral density filter
A soft graduated neutral density filter offers a smooth transition gradually changing from dark at the top of the filter, to light in the middle of the filter and clear in the bottom half. The darker part of the transition gently “fades” into the lightest part with no noticeable dark lines in the horizon area being introduced from the filter in an image that has been exposed correctly. These are best used when there is not such a noticeable difference between the dark and light areas of the scene, and when there are things such as buildings, mountains, bridges or any similar elements above the noticeable horizon line. The gradual transition should allow for these elements to still be exposed correctly if the filter lines up with them.
When to use a medium graduated neutral density filter
Medium graduated neutral density filters have a much more noticeable transition from darkest at the top, to lightest in the middle of the filter and clear in the bottom half. These are best used when there is a noticeable brightness difference between the elements of a scene that you need to control such as when the sun is higher in the sky. Medium grads can be used when there are smaller elements above the horizon such as building and mountains. The bigger these elements are, the darker they will become when lined up with the top parts of the filter, potentially introducing under exposed elements in an image. A medium grad will produce more contrasty, dramatic clouds and sky when compared to a soft grad due to the difference in transition.
When to use a hard graduated neutral density filter
Hard graduated neutral density filters have a very defined horizon line and are best used when there is nothing protruding above the horizon in a scene such as shooting a seascape with a straight looking out to sea. If there is anything above the horizon, these elements are very likely to be impacted on when capturing an image. Due to the defined darker horizon on the filter, it is very important to make sure this lines up correctly with the horizon in the scene otherwise you will see a noticeable unwanted darker line in parts of your image.
When to use a reverse graduated neutral density filter
Reverse graduated neutral density filters are darker in the middle, with the transition fading away to be lighter in the top half of the filter. Just as with a hard grad, there is a noticeable darker line in the middle of the filter, so care needs to be shown when aligning them with your scene. Reverse grads are designed to be used when the sun is lower and more intense closer to the horizon just on sunset or sunrise.
How to use a graduated neutral density filter
Once you have decided what density and which type of graduated neutral density filter you will use, it will be a matter of inserting the filter into the appropriate holder and aligning it with the part of the scene in which you want to control the brighter light. Graduated filters need to be positioned in the first available slot in front (closest to the front element of the lens) of any other filters being used such as a 6 stop or 10 stop neutral density filter. By sliding them up or down, or rotating the filter holder you will be able to position them appropriately to capture more detail in a single image, therefore potentially reducing post processing time and ensuring you are producing the best quality image possible.

Slide up and down to match the horizon position to balance the exposure.
Be careful not to push the filter too far down as it may darken the foreground, which defeats the purpose of darkening the brighter part of the image.


I have the S5 system for the Sony 12-24mm. I cannot understand why you don’t have an adaptor for my 16-35mm which is a 72mm thread.
Hi Paul, We agree so that is why we made one! It was released a couple of weeks after the S5 for Sony 12-24mm. Check it out here: https://nisifilters.com.au/product/nisi-72mm-filter-adapter-ring-for-s5-sony-12-24mm/
Do you happen to have an adapter for S5 for Sony 12-24mm to 77mm and 82mm?
Hi Mark, We have released a new universal S5 adaptor for standard filter threads that is available now. Out of the box, it will support filters threads 105mm, 95mm and 82mm. Check it out here: https://nisifilters.com.au/product/nisi-s5-adaptor-only-for-standard-filter-threads-105mm-95mm-82mm/. To also support a 77mm thread we have a 77mm adaptor available here: https://nisifilters.com.au/product/nisi-77mm-filter-adapter-ring-for-nisi-150mm-filter-holder-for-95mm-lenses/
Hi, does it matter which side of the glass is facing outwards? I’ve been told nisi lettering should be facing out is this correct.
Thanks Mark
Hi Mark, With ND filters the NiSi lettering should face out and be in the back slot closest to the lens. This will create a seal between the foam and the holder to stop light leak. With GND filters it does not matter which way they face.